Sunday, October 31, 2010

It's Halloween! Time to Reveal Our Costumes!

We took a day off of house projects to enjoy some Halloween festivities.  Before I get to reveal our costumes, I have to share some pictures of the cute Halloween things in our house that will sadly go away after today.  Here is our antique chalkboard (tutorial on how to make one of your own is in this blog) that we seemed to keep adding Halloween drawings to throughout the month.  My favorite is Alex's drawing of the witch on the left.


With our pumpkins and candles lit in the fireplace, we watched a couple classic scary movies   This created the perfect spooky ambiance for a movie!
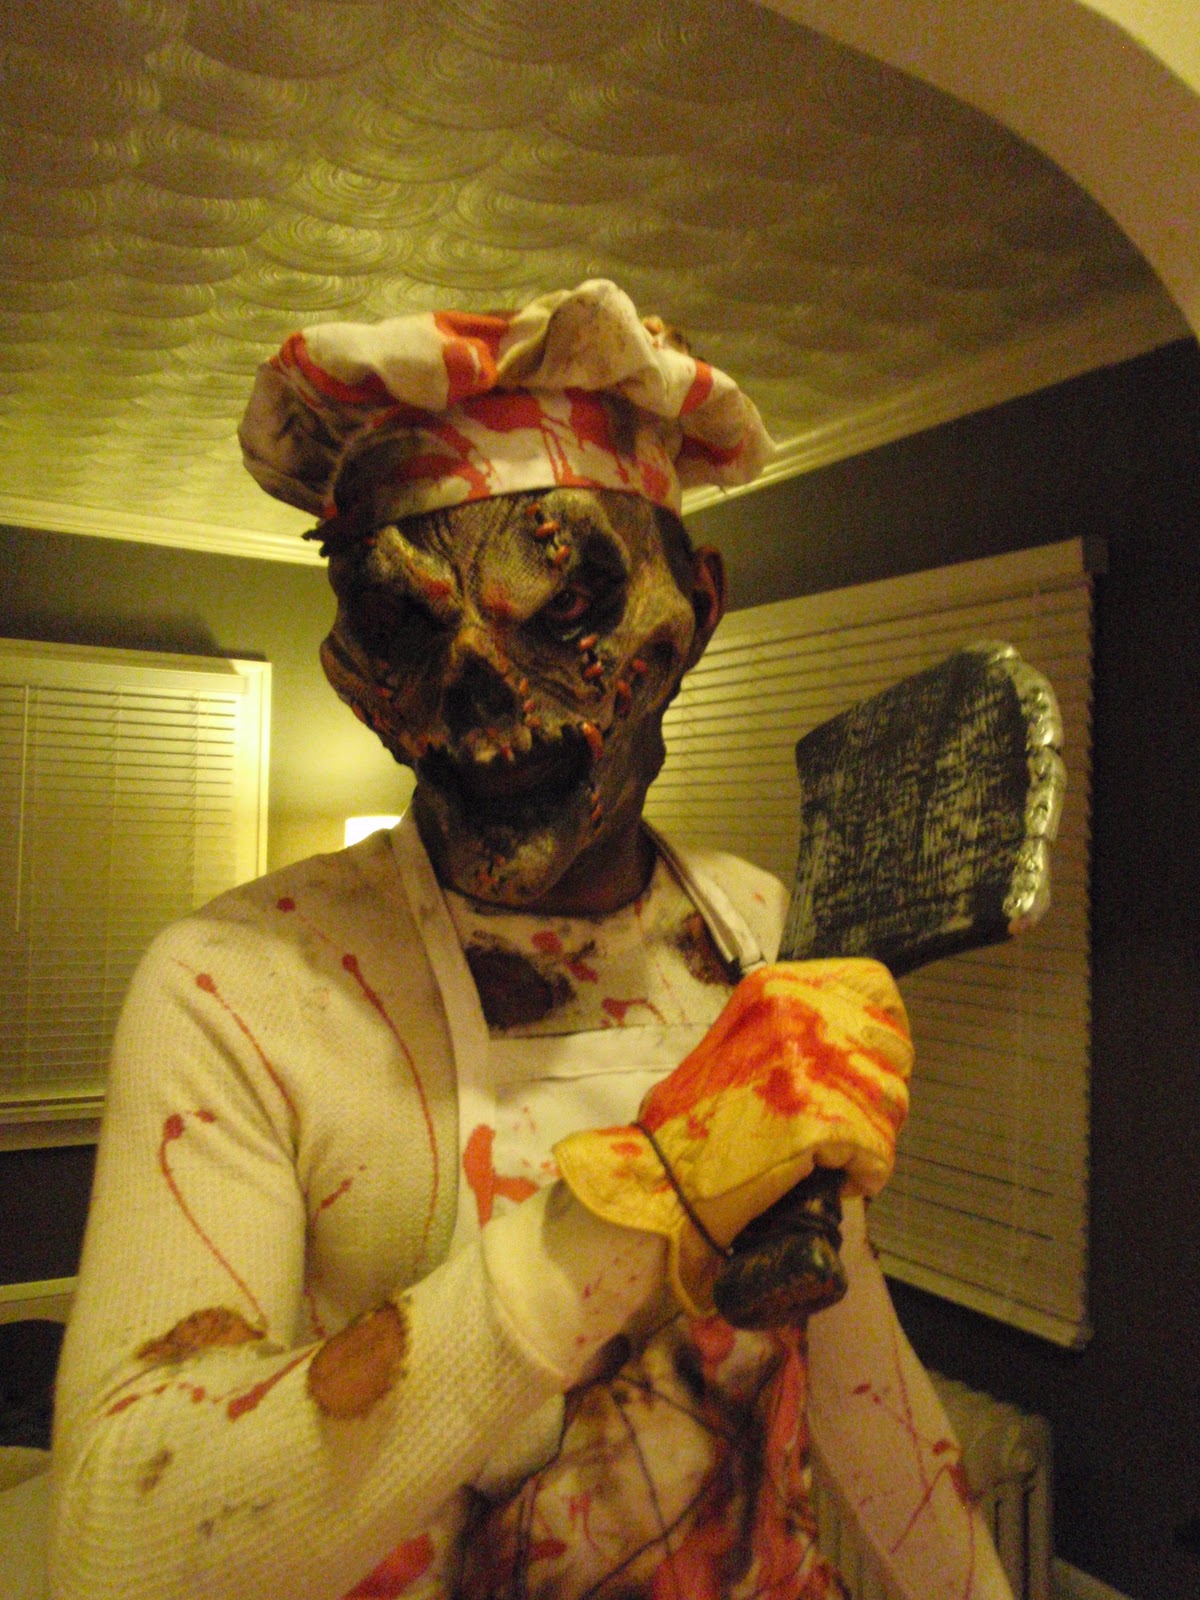
Drumroll...Here is Alex in this year's costume creation!  He is an evil butcher, Alex likes to go all out on Halloween and wear something super creepy. 
Here is a close up of his face.  He used an FX mask that you glue on with spirit gum so it moves with your face.  In his true DIY spirit, Alex made the rest on his own, got the apron, hat, gloves and thermal, then burned and bloodied them up.  I totally loved it!
Here is mine, not as scary and cool as Alex's but I found out 3 years ago that I don't like being scary (I was a zombie, Alex helped put it together for me, people just looked at me like I was gross all night, kind of made me sad).  So I usually stick with something cute but matching to Alex, so I was a Chick-A-Dee waitress (wished I sewed something myself, but got too busy with other projects).  So, evil butcher and the waitress at his shop kind of thing.  We went out to a costume party with some friends, the best part was watching all the reactions to Alex's costume......Very Fun! 
Well, I hope everyone has a great Halloween!  I can't wait to hand out candy to the kids in the neighborhood and check out all the costumes later tonight!

Saturday, October 30, 2010

1,2,3,4,5,6...The Chair Covers Are Done!

Finally!  I finished up all 6 chair covers! 
Here is a link to:

I ended up still spray painting the rest, didn't hand paint like I thought I would.  So here they are!
The leather on the chairs is nice, but it will be fun to have the lighter linen look for a while.  I think they will add a nice touch over the holidays too!


Friday, October 29, 2010

The Last of the Trim is Up!

We have been a little slow finishing up the last of our Redo of our Bathroom Redo (started in this blog, then here, here and here). But we are now in the final stages of completion!

The last of the trim is finally up! Alex cut corner edge, floor trim and top trim chair rail to finish off the beadboard.  Next, all we have to do is paint it white (it's currently just primed white).  I plan to get started on that tomorrow morning and will hopefully get it done in one shot! 

Here is a preview of what the 'after' will look like.  I'll be sure to post more photos of all the details and decor when we are finished up!

Tuesday, October 26, 2010

Happy Howl-o-ween!!!

 On our grocery trip to Target, we found Rocco and Sadie their Halloween costumes.  No surprise though, they were not too fond of them! Sadie was a magical pink unicorn with a princess riding on her back (ha!) and Rocco was an evil black stallion with the headless horseman riding on his back.
We know they hate wearing clothing/costumes, so we don't do it a lot. However, we can't help but try to dress them up for some quick pictures.  They look so cute don't they?!?! Minus the grumpy looks on their faces.  Rocco and Sadie have a hard time holding still for pictures, but man, when you put costumes on them, they end up like statues!
Here is a closer shot of Rocco, he is so stinkin' cute!  I love the little hat!  The little pumpkin head jiggled when he walked (he didn't walk/move unless we bribed him with Pup-eroni's). 
Here is our magical unicorn Sadie with the princess in tow!  It was fun making her all pink and girly since she is a more outdoor-sy hunting dog. Sadly, Sadie tried to eat her princess after this photo was taken, poor princess.
Well, they had them on for about 5 minutes and then we had to take them off, we felt bad; they looked miserable.  Who knows though, we might need to break them out again on Halloween. I think the trick-or-treaters will get a kick out of their costumes! Happy Howl-o-ween!

Sunday, October 24, 2010

The Halloween Theme Took Over Our Mantel

I wrote about my first experience decorating for fall in this blog. I will quote what I said about the mantel decor, "I wanted to give it a bit of a fall look, but not overly theme it."  So what happened 3 weeks later?  This happened...
Yea, I don't think you can get more themed than that!  The pumpkins multiplied from 4 to 13 and the 'Happy Halloween' banner officially made our mantel overly themed.  Again, Alex built the mantel last year, here is the blog showing how he built it (still so thankful we have a mantel, otherwise I would have nothing to decorate!).  With Halloween a week away now, I think we can enjoy the festive decor, then tone it back down. But it turned out pretty cute and fun! 
Now, time to light the candles and watch some scary movies!

Saturday, October 23, 2010

Annual Pumpkin Carving Challenge! Alex vs. Carla

In preparation for Halloween, Alex and I always carve pumpkins together.  Last year, we started making it a contest as to who carves the better or scarier pumpkin.  We research designs and hide them from each other so once we are done carving it is a surprise.  Yep, kind of dorky, but we have a good time doing it!  We had the pumpkins out on our porch before carving for decorative appeal.  Unfortunately, squirrels seemed to nibble the back of Alex's pumpkin, at least they didn't make a hole!  So, once we covered our table and got the knives ready, we started the carving! 
We had the 'On Gaurd' with our Sharpies, and started tracing out our designs.
Alex snapped a picture of his...
And I took one of mine before carving...
After some intense carving, we got these guys!
Alex lost part of his eye and a tooth, thankfully he didn't have an 'Alex cursing fit'.  So, since this is technically my blog, I declare myself the winner of the challenge.  My Boogeyman pumpkin wins!

Thursday, October 21, 2010

Chair Cover Project: Adding Designs to the Chair Backs!

I have been working on this chair cover project for quite some time now.  I got started on them in this blog then wrote the tutorial about sewing them in this blog.  I finally got the guts to cut out stencils and paint the designs onto the chair backs.  I have been putting it off for a while now, just a little nervous about how they would turn out.  After all the hard work I put into sewing them I got worried if they didn't turn out right after painting the design then I would just have to get rid of the covers.  Luckily, the first one turned out great!  So I am getting in gear to finish up all six chair covers!

This is the chair cover I saw in Rachel Ashwell's Shabby Chic shop in NYC that inspired me to make my own:
It took us a while to determine what we wanted designed on the backs.  We agreed to use numbers because we have number decorative pillows in our living room from Pottery Barn, so it makes a perfect match!  Here is a picture of the pillows:
Here are the steps I took to add the design to the back of the chair cover:

  I started by printing out the design we wanted from my computer and then I copied it to poster board. The font I used for the "No." part was Ewardian Script ITC and for the "1" (or whatever #) I used Garamond.  Once on the poster board I used a craft razor to cut out the text to make a stencil.
Here is a picture of cutting out the number from the poster board.
Once I had my stencils, I laid them down to be painted.  I decided to use spray paint because it was a technique I was familiar with from my younger days when I would make t-shirts and tanks for my friends. However, I'm considering painting the next ones by hand. 
Here it is after spray painting. It turned out fine but I got so nervous about the paint running off the poster board and back into the fabric. It did a little on the 'No.' stencil but luckily it gave it a more vintage and distorted look, so I didn't get mad and have an 'Alex cursing fit'. It is however a reason that I'll be doing it by hand on the next few.
Here it is once I fit it onto the chair.  I love it!  I can't wait to have the full set finished.  I might make another 'No.' stencil in a different font so some will be slightly different instead of too matchy-matchy.
I think the fabric and the dark gray paint looks great together.  Kind of reminds me of the Vintage French Linen pillows at Restoration Hardware:
By the way, I am in love with those pillows, maybe I need them?  Or maybe that is the next project, however stenciling that would not be fun!

Tuesday, October 19, 2010

A High Heels Moment!

Should be no surprise, we spend most of our free time fixing our house, but we got to take a break this weekend (hence no update on the bathroom or chair covers) to attend our friend's wedding!  I love going to weddings, and I love any opportunity to get all gussied up since it doesn't seem like we get to a lot anymore.  I spent time doing an updo on my hair, borrowed a dress from a friend (helped to save me some cash), and put on some killer 4.75" heels!
The best part? I got to wear my Grandma's vintage mink (passed down from my Great Great Aunt Lucille). It was a beautiful, but brisk fall day, so I kept warm wearing the fur. I have to add a disclaimer of course, I would never buy fur or wear it otherwise, the fact that it is a family heirloom means a lot to me so I wore it proudly and tried to channel my Pierson side!

Here is a picture of the newlyweds. Their wedding was totally fabulous, I loved their vintage Rolls Royce.  We snapped this picture as their photographer was taking more photos of them.  The brides dress was totally amazing and dreamy as well! Sigh, I love weddings, seeing all the different styles is so fun!

Monday, October 18, 2010

Circuit Overload! Adding Basic Electrical Skills to Our Renovation Resume

Surprise, surprise, something bad and inconvenient happened in our old house... electrical issues.  Alex and I are total DIY-ers, but there are two things that bring us slight fear when working with- Plumbing and Electrical.  Basic plumbing and electrical installation is no problem (like a sink, toilet, or light fixture).  But troubleshooting a mystery electrical problem is pretty scary.

We found this super helpful site called The Circuit Detective and after a little research, Alex was able to determine that the problem was a tripped GFCI outlet due to circuit overload. Who knew that running a sawzall through a kitchen outlet would be a bad idea? Turns out that when a circuit runs with a heavy load for too long the GFCI will trip because it can't determine if the power surge is being caused by a short or water hazard. It's a great safety feature, but it put three power outlets, two recessed lights and a dishwasher out of order (when the dishwasher is down in our house, it becomes top priority to get it fixed!)

NOTE: Even though the outlets weren't working, they were still hot! After Alex got a few good jolts and a tingle coursing through his hand and arm, we decided it was time to kill the power......I'd suggest you do the same if you tackle any electrical work.

Alex removed the faceplate and exposed the wires. He paid close attention to the schematics of the wiring and carefully removed the old tripped outlet
He made sure to check all of the load connections that will be running from the new GFCI and made any necessary connection improvements (a few were loose). 

With the connections re-established he was then ready to wire in the new outlet
Once the wires were properly attached and the power restored, the tell-tale light in the corner let us know that the system/GFCI was installed correctly and once again protecting our kithen outlets.
Once the power got started again, Alex moved on to fixing the dishwasher.  We had to pull out the dishwasher to disconnect the power when Alex fixed the electricity.  While pulling it out, the water supply line kinked near one of the fittings which resulted in a leak (of course). So then we had to get a new one and install it.  Good times.

Sunday, October 17, 2010

I Hate Our Front Door, But It Just Got a Little Cuter!

Well, this is kind of dumb, but I am going to blog about it.  I got our first front door wreath!  We haven't had any wreaths before for our house (or apartment or condo), so I was really excited about it.  I knew I wanted to get a wreath for Christmas this year since we didn't have one last year, but while visiting Joanne's to get more fabric for my Chair Cover Project I found all the fall wreaths on sale for half off!  I couldn't resist, and oddly, it took me almost a half hour to pick out a wreath!  Pretty stupid, but I couldn't help but compare them all trying desperately to picture how they might enhance our curb appeal and spruce up the look of our house.  Anyway, here is the one I picked, I think it is super cute and makes the outside of our house look far more cheery.  Once we carve pumpkins; I think the whole front porch will look seasonal and cute. 

So why do we hate the front door? Well, we aren't totally sure if the door is the original door to the house, but it is pretty darn old.  We think it is cute, but when it comes to being functional and energy efficient it is a big problem.  Here is a look at the cute little mail slot that says 'Letters'. 
We actually do get our mail in this slot since we don't have driveways in our neighborhood or mailboxes along the street.  It is pretty small (our Netflix won't fit through) ha!  It is darling, but we are pretty anxious to get a fancy new door (and I'm hoping we can paint it red to add some color and character, it would pop against the white trim, right?).  If we do ditch the door completely, I plan to salvage the 'Letters' slot somehow.  I think it would look great with the paint in our kitchen and dining room.

Thursday, October 14, 2010

The Morning Glory Story

It dawned on me when I created our House Tour page that I never showed any after pictures of the left side of our Ugly Yard Overhaul.  The biggest change was planting morning glories back in June to grow into the ugly (but convenient when you have 2 dogs) chain link fence.

Here is the before picture of the left side of the yard.  We had to remove 5 large bushes along with several plants and a lilac tree.  We laid grass patch down where the plants were removed.  All we wanted was a grass yard so the doggies could run around, who knew that would be so hard?  Since we live within the city in an old neighborhood, that is the alley you see behind our yard.  We planted the morning glories so they could grow into the fence and make it look pretty along with hiding the alley from view.


I'm kicking myself for not taking afters in the summer when the yard was lush and green, but here is the after (with some fall leaves).  It took about 3 or 4 months of growing, but those morning glories took off!!!  We now don't have to look at the concrete alleyway or the chain link fence, so much better!

The little flowers that bloom along the fence are so pretty. There are tons in the morning (hence the name) but a few will last throughout the day.

Tuesday, October 12, 2010

DIY Chair Covers: Simple Step By Step to Make Your Own Chair Covers

Phew!!!  Feeling a bit pooped, but pumped that I got finished with chair #3 for my chair cover project!  I started this about 2 weeks ago (sad) but got busy with sanding and painting our table and helping Alex with the bathroom redo.  So once I got started on chair 3 I felt pretty confident with the steps and decided to snap pictures as I made the cover so I could share. 

Before I get started, I have to mention that I only had to cut 2 pieces of fabric.  I learned after the first chair, that I was cutting out too many pieces and it got too complicated.  All you need is 2 pieces of fabric!  I picked up some linen-looking fabric from Joanne's for $3.99 a yard (had a 40% off coupon too, so make that $2.39 a yard-woot!).  Here we go!

First, cut one piece of fabric to cover the face and back of the chair back (so the fabric folds over the top).  Then, sew the sides together stopping where the chair back meets the seat.  I tried to illustrate by pinning the sides, so this would be the inside of the cover.

 Second, once the sides are sewn pin the top to make a corner for the chair top (looks like a little triangle).  Make sure to sew a smaller corner than you think you will need, easier to sew more after to fit than it is to seam rip and start over.

After you sew each top corner and flip right side out it should look like this...

Here is where the tricky part starts.  So since we are only working with 2 pieces of fabric, you have to leave the chair back side piece whole, but cut the chair face side fabric to end at the seat.

Here is what that piece looks like off of the chair (in the photo you can see I left the back piece whole and cut the front shorter).

This is the second piece of fabric for the seat.  I cut out a little rectangle in the center of the fabric that is half the depth of the chair back.

This is what that rectangle is for, it will line up where the chair back and seat meet and wrap the side of the chair back to match up with the chair back piece (the first sewn piece of fabric).

Here is the chair back piece flipped inside out pinned to the chair seat fabric to be sewn.  Line up the edges of the fabric and pin together to make sewing easy.

Here is a view of the seat with the pins lined up for sewing.

View of the other side pinned for sewing.

The part where the sides turn up to the seat is very tricky to sew.  Keep pins in place and take the corner slowly.

After you sew and flip right side out this is how the corner should look.  It is definitely the hardest part to line up and sew.  It took me until the third chair to get the hang of it, but once you do the way the cover fits the chair is perfect!

Now the front corners, flip the cover inside out so all seams are showing.  Then pin where your corners are located and cut off excess fabric.

Once you sew the front corners you are ready to hem the bottom!  First make sure you cut the bottom so it is even and level with the bottom of the seat.  Then iron about a half inch up for the hem.  Here is the hemmed edge of the back of a cover...


You should now have a chair cover!  I have 3 done so far, it really gets easier as you go.  I have 3 left, then onto adding the prints to the chair backs!